3D Printing Projects 202011 – Squaring up the Ender 3 X-axis – PostScript – Tire tread depth gage turned digital dial indicator

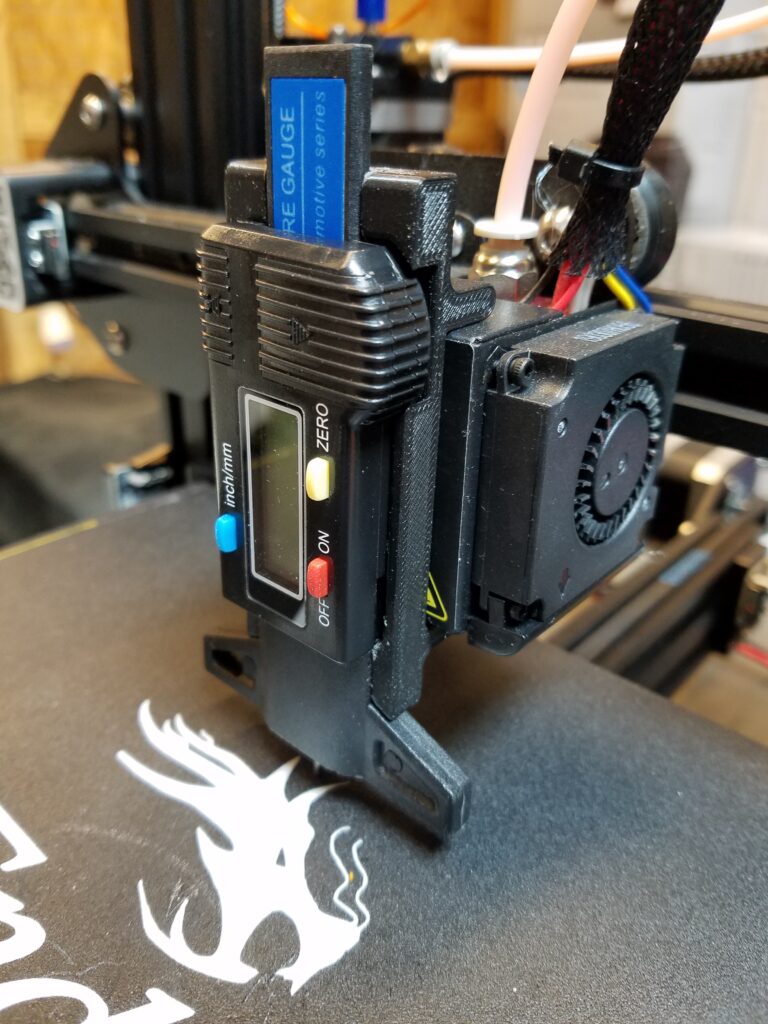
Tire checker turned Depth Gage…

A nice bracket to hold the tire check gage was found for Ender 3. (Thingiverse #3732166 ) This simple bracket holds the tire gage clipping around the extruder fan casing. It is a nice concept but we found there needs to be a shim to make it fit tight enough that the readings are accurate. Either printed with spring tensioning slots or some kind of clamp would be an improvement. A future project! Having tested many levels with a piece of paper for a shim stock looking at numbers is sort of a soothing relief. As we want to check the tram when everything is to temperature the bracket was printed in ABS.

After a while it was a bit tedious to position the table and extruder by hand so time for some programming.

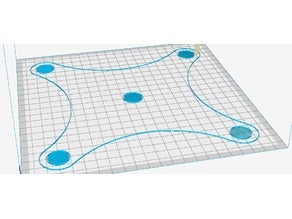
The autoleveling routine found on Thingiverse (# 2987803 ) was modified to remove the printing code and just go from location to location to check with the depth gage. The routine has stops at each position and waits for the operator to push the button to proceed to the next position.

THE RESULT:

Because you don’t want the nozzle to drag on the table a clearance offset of 40 mm was used to move from measurement spot to measurement spot and then 30 mm for the measurement point in Z.

The tire gage plunger is not spring loaded and has to be applied manually but this is OK once the bracket is secure on the extruder housing.

As the bracket attaches to the extruder fan box it is not tight and easy to bump out of place. To make the bracket “clip” tighter some modifications were added via TinkerCAD. A couple of slots and an extra bump made the bracket nice and tight and give more consistent measurements.

Note the negative material slots and the extra bump in orange to provide a “spring” to pressure the clamp on the extruder fan.

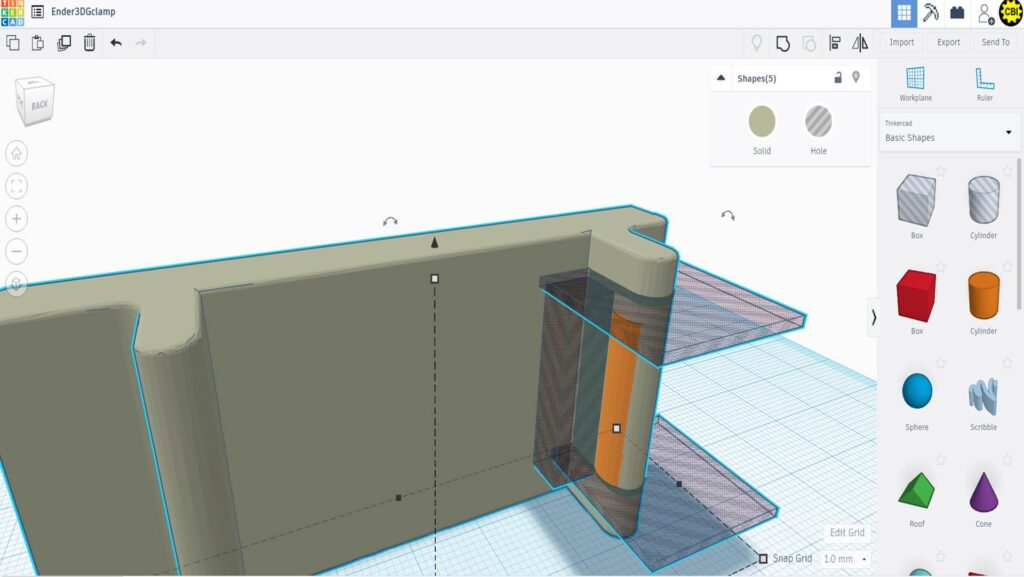
The original bracket was uploaded into TinkerCAD and the modifications shown grouped and then downloaded. The part was sliced in Simplify3D and printed on and Ender 3 in PLA.

3D Printing Projects 201332 – Rostock MAX upgrades – fan plugin

MB_RMfanThe fans for the Rostock come with tiny micro Molex connectors. The spacing is smaller than standard 0.1 inch header spacing. Wanting a sturdy end to the power festoon to the hot end a block was developed that engaged into the top mounting ring. Besides dowels that plug into the existing top plate a round cavity allows for a commercial strain relief to bring the power wire from the stationary part. A couple of square holes allow for plugging in of the micro Molex connectors. Wire was used to make pins guided by holds printed in the block. A groove to interlock the connector orientation was printed as well.

The block was designed in SolidWorks and printed in ABS.  Now the fans can be plugged in and the connection of the power wire to the hot end securely fastened.

3D Printing Projects 201331 – Rostock MAX updgrades – cooling

MB_RMcoolingIn getting the parameters dialed in for printing PLA a cooling ring is envisaged to cool the extruded material as it leaves the hot end. This mounts to the bottom of the Rostock Max extrusion platform. Internal baffles and differing size exit holes work to equalize the pressure to make a 360 degree cooling zone. A 25mm fan blows air from the side and gets directed to the printing interface. Eventually a set of clips will be integrated to clip on the axles of the delta unit.

The shroud was designed in SolidWorks and printed in ABS.  Once the shroud was in place a connection had to be developed for powering the fan. See later post.

3D Printing Projects 201330 – Remade Golf Ball Retriever

MB_GBretriever2A friend had a couple of golf ball retrievers that had aged and deteriorated. They liked the performance but of course were broken beyond functionality. 3D printing to the rescue. As the design proceeded we realized the assembly could be printed as one pre-assembled piece. Other features included a flared pin to hold the inner ring from falling out and a hex recess for accepting a nut for the mounting MB_GBretrieverscrew. To get  a good pin some sacrificial supports were developed that were removed after printing.

The assembly was designed in SolidWorks and printed in ABS.  The Maker community has requested it be posted to Thingiverse. That is the plan but if you’re itching to try it you can download the .STL here. It is also the signature application for a Maker event at the Cumberland Business Incubator Labville. Read about it here.

3D Printing Projects 201323 – Keyless door entry clamp

doorclamp3Security is always an issue but occasionally you want to have your place of business more inviting. A simple clamp pinches the crash bar closed thereby temporarily unlocking the door. Having done this numerous times the trick to having it work the first time is to make sure the unit is not too thick and the fingers will fit between the backside of the crash bar and the window of the door. The nice bright yellow alerts someone that the clamp is on. In this case we personalized it for the venue so it doesn’t walk off.

The part was developed in SolidWorks and printed in ABS on the Makerbot in 3 hours, 5 minutes.

3D Printing Projects 201322 – WOW cookie press

TPM Technologies Cookie PressOn the heels of customized dog biscuit cutters the humans felt left out. We developed a series of cookie presses to turn a dough ball into flat form for baking. I developed them for my Mom so they are labeled as such. For other people you turn them upside down and then they are WOW presses. Various shapes impart designs into the dough. The parts were developed in SolidWorks and printed in ABS. The handles are printed separately.

3D Printing Projects 201321 – Wide Angle Lense Mount for iPad

makayama mountFor running Skype and having a conference with many people in the room it is handy to have a wide angle lens. The Makayama iPad attachment has a lens mounting for the back camera but not the front. The Makayama iPad accessory holds lenses over the built-in cameras of the iPad and provides attachment points for a tripod and lights and microphones. The tripod mount is the standard 1/4″-20 mount and the light and microphone attachment points mimc the “hot-shoe” style mount of most SLR’s. We wanted a “quick” clip to put the lens in place and then be able to quickly remove it. This clip holds the 37 mm wide angle lens against the iPad screen. The back of the clip engages with the bumps on the back of the Makayama unit to keep the lens in place and aligned over the iPad’s front camera. Now the wide angle can pick up everyone in the room.

The clip was designed in SolidWorks and printed in ABS. The clip has extended the capability of the lens and our Studio YouTube-Mobile unit.

3D Printing Projects 201320 – Hair Cutting Vacuums

floyd wandsAfter experimenting with vacuum robots (We had one that was a modified Lost in Space replica) at a local hair salon we settled in on a very effective central vacuum system. We installed under-the-cabinet, toe kick space, low profile units but found that it would be handy to have additional wands as well. Makerbot and 3D printing to the rescue. The standard hose for barber attachments is 1″ OD whereas typical central vacuum systems use a 2-1/4″ OD form factor. We developed a manifold to adapt the valve and switch body to the hose and then an ergonomic and colorful wand for the floydwandlayoutother end.


The parts were developed in SolidWorks and parts printed in ABS. Issues with the small footprint not wanting to stay attached to the print table and wanting to avoid excess warpage caused us to incorporate some break away tabs in the original model. The size of the wand forced us to lay it out diagonally across the table and the hose attachment was large enough that it had to be printed at an angle in the Z-X or Z-Y plane as well. Originally the idea was to grind off the rib but we found it was a natural tab once the wand was in your hand. The flange holds it in place via another clip made with 3D printing (not shown).

3D Printing Projects 201319 – From Sorry Token to Mexican Train

SMexTrainTokensWe were having a party at the house and the plan was to play Mexican Train, the domino game, after dinner. Depending on whose rules we’re using invariably we end up scrounging for tokens to represent open trains. How about if we RP’d customized tokens for everyone? The original model did not print well with the old ReplicatorG 37 and version 5.5 in the Replicator. After upgrading to ReplicatorG 40 and 6.0 the prints came out with a lot more detail. Everyone enjoyed having their personalized train.

The model was developed in SolidWorks and tokens printed in ABS. Of course different colors had to be developed for all the players.


3D Printing Projects 201318 – Sorry Token or attack of the pawns

Sorrytokens In describing the 3D printer to some friends, one asked, “What would I do with it if I had one?” Off the top of my head I said, “If you lost a token for your Sorry Game Board, you could print another one.” Then as sort of a joke I made a collection for her and her pals. The model is sort of convenient as it prints in 20 minutes and works fast enough that people get to see the process of 3D printing. They would equally well as pawns in a chess game. Parker Brothers effectively used Social Media for the demise of the flat iron in Monopoly. In the not too distant future they may have a whole catalog where you can choose custom tokens and better yet, nicer looking houses and hotels!

This model was developed in SolidWorks but it is a simple revolution so many tools would do an ok job. These models are printed in ABS.